Castlevania Walkthrought
Now for the good stuff: the walkthrough. We’re going hall by hall through Castlevania on the NES — the OG Dracula’s castle that shreds nerves like a proper horror. I’ll lead you by the hand: what to smash, where to grab that classic wall meat, which rooms to blitz through, and where to calmly farm hearts for sub-weapons. No fluff — just routing, secrets, and tech that actually helps you close bosses with minimal losses. Let’s roll.
Block I: the courtyard, galleries, Giant Bat
The opening yard is a warm-up, but right here this Castlevania walkthrough sets the habit: crack the first big candles for a whip upgrade, then don’t get stingy — break everything in sight. On stairs, keep your distance: one sloppy step and the knockback dumps you into a pit. Before the boss door, check the left wall by the entrance — there’s a hidden roast; remember it as a reference, the castle hides lots of similar nooks. At the end of the block, a tall candle often drops the axe — perfect versus the Giant Bat: lob it in an arc, finish with the whip. Want more damage? Try to snag “II” or “III” (Double/Triple Shot for sub-weapons). Roman numerals drop when you keep landing sub-weapon hits in a row, so in the long corridor before the boss, don’t be shy — keep axing those skeletons.
Block II: lower passages and the Medusa tower
The watery dungeon is your first real precision check. Mermen leap out of pools — don’t rush; keep a steady tempo so knockback doesn’t send you to your doom. Bone Pillars in alcoves are great for heart farming if you need ammo for the boss. Holy Water is MVP here: knights and zombies get stuck in the blue flames while you carve a path. Before the climb to the tower, watch the candelabras — don’t overwrite a good sub-weapon by accident. In tight shafts with Medusa Heads, move in a wave: step — strike — step; don’t jump for no reason. Before Medusa’s door, check the floor brick by the right wall — there’s usually meat. The boomerang cross is best for the boss: throw on rhythm, catch the return, and weave through those snaking arcs. If you’re down to just the whip — don’t panic, hold mid-range and tag the head as it dips.
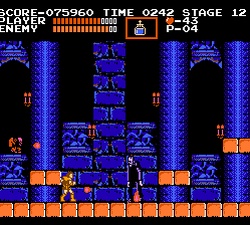
Block III: knight galleries, sarcophagus mummies
This segment is infamous for “hunchbacks” (Flea Men) and troll-y staircases. Simple rule: don’t trigger extra spawns — as you enter a screen, take one step, bait the first jumps, swat them with the whip, then advance. In the long hall with knights, don’t trade face-to-face — drop Holy Water at their feet and roll forward, scooping up big hearts. A fat purse hides in a suspicious wall to the right of the short staircase — don’t miss it. Before the mummies, having “II/III” is clutch — splash Holy Water at the tomb exit and start stun-locking the bosses, tossing on cooldown. They get stuck in the fire carpet, and the whip just seals the deal. If you’ve got the axe, hold a diagonal lane: its arc slices through those bandages beautifully.
Block IV: the workshop, conveyors, and Frankenstein & Igor
Transition rooms with moving platforms punish impatience. Don’t jump the instant you climb a ladder — count a platform cycle first. In halls with Axe Armors, stand two tiles outside their reach and whip at the top of your swing — it’s easier to keep tempo without eating a counter. The key to beating Frankenstein and Igor: enter with Triple Holy Water, lay flames mid-stage, and control Igor with hop-backs. If you lost your sub-weapon, don’t play hero — smack Frank in the head and track Igor’s arc; he always curves toward you and gives a window after he lands. There’s meat before the boss — break the tile by the lower staircase to the left of the door.
Block V: the infamous Death hallway and the Grim Reaper
This is the corridor that makes people google “Castlevania NES walkthrough” step by step. You want the boomerang cross or Holy Water — and absolutely no swaps before the door; don’t overwrite your sub-weapon! In the room with knights and Medusa Heads, keep moving: the cross boomerangs to clear your six while you crack shields on approach. If you picked up “III,” don’t change rhythm at the corridor’s end. Pro tip: right before the boss room, there’s usually meat in the left wall — top off, then go in. Versus Death, a reliable strat is flooding the center with Holy Water and pelting crosses. Sickles spawn in waves, but if you lock down the Reaper’s spawn point, he never really gets going. No sub-weapons? Hug the right edge and swing on timing, letting sickles desync under you by jumping as they return.
Block VI: the throne room and Dracula
The final ascent is ladders galore and candles with big hearts. It’s about control, not raw damage. Don’t pick up a stray dagger instead of your ideal kit — candles near the entrance love to bait your reflexes. Right before the door, check the left wall — there’s often a last roast tucked away. Dracula’s first phase is teleports and fireballs. Stand at the platform’s edge, tag his head after the third fireball, then hop to the next pedestal. The rhythm loops: step — strike — step. A Cross with “II/III” speeds this up massively. For phase two, either the axe (great for high hitboxes) or Holy Water — lay it where he lands and finish with the whip. Most important: don’t start without a heart bank, or you’ll be stuck swinging a naked whip at the worst moment.
Little nuances that save lives
Checkpoints are generous, but it’s best not to fall “down a staircase” by your own slip. In tight spaces, enter with a whip shield: step — strike — step — strike, so knockback doesn’t punt you into a pit. Need a quick heart farm? Look for flat halls with skeletons and two-tier candles — swing like a pendulum and you’ll pull 10–15 hearts a minute. About the “alternative name”: whether you call it Castlevania, “Kastlvaniya,” or plain old “Dracula’s Castle,” the route’s the same — the sub-weapons are what change everything. Holy Water and the boomerang cross solve most choke points, the axe answers high targets, the Stopwatch is situational (mermen and Medusa rooms), and the dagger is a last resort. And don’t forget “II” and “III”: they turn any loadout into a boss shredder.
If you get stuck, scroll the screen back, reset spawns, and rebuild the room — totally legit Castlevania tech. Don’t be afraid to change gears: some areas are a straight brawl, others are candle-and-heart economy. And the golden rule for a clean run: don’t grab everything. One wrong candle and you’ve lost the perfect cross before Death. Stay cool, mind the ladders, check suspicious walls for meat — and the castle folds. It’s that kind of run where your hands memorize the path, and your heart (and hearts, too) beats to the whip’s rhythm.